PRTG Manual: TWO—Using the Configuration Guru
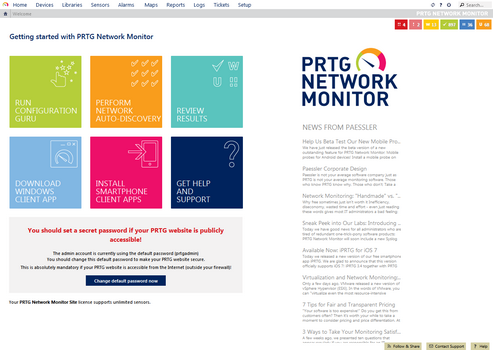
For a new installation, PRTG will open the Configuration Guru automatically after each login. It will reappear until you either ran through it completely or skipped it. In order to open it at any time, please click the Run Configuration Guru button on PRTG's Home screen.
Note: When using the Enterprise Console, please start the Guru by selecting Help | Run Configuration Guru from the main menu.

Ajax Web Interface Home Screen
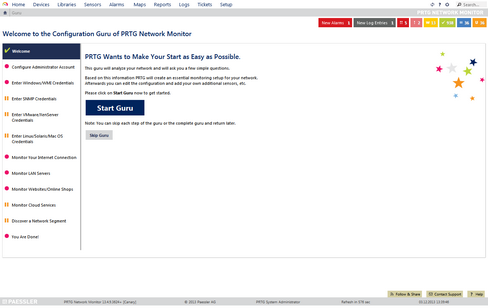
By answering about ten simple questions, this assistant will guide you through an initial setup and pre-configure an essential monitoring of your network including important devices, servers, and websites. You can later adjust these automatically generated monitoring settings later by hand.

Configuration Guru Start Screen
The steps to go are:
- Enable SSL Encryption
- Configure Administrator Account
- Enter Windows/WMI Credentials
- Enter SNMP Credentials
- Enter VMware/XenServer Credentials
- Enter Linux/Solaris/Mac OS Credentials
- Monitor Your Internet Connection
- Monitor LAN Servers
- Monitor Websites/Online Shops
- Monitor Cloud Services
- Discover a Network Segment
- You Are Done!
Click on the Start Guru button to start. You can skip a step at any time by clicking on the Skip button.
This step is shown only if your web server runs on http. We recommend running the PRTG web interface using SSL encryption (https), especially if you make your web interface available from the internet. Without encryption your passwords are sent over your network unencrypted. Choose between:
- Yes: Switch the PRTG web server to use SSL. A popup will appear, showing you the screen shot of a certificate security warning that will be shown the next time you load the PRTG web interface. Confirm by clicking the button Yes, switch to SSL now. After you confirm, the PRTG core server Windows service will be restarted and the web interface will be reloaded, most likely showing a certificate warning. Confirm it to proceed to the login screen. For more information, please see SSL Certificate Warning.
- No: Skip this step and keep using an unencrypted http connection. Once you skipped this step, it will not be shown again. You can switch to SSL later by using the PRTG Server Administrator tool from the Windows start menu. For more information, please see PRTG Server Administrator.
Click the Save & Next button to apply your settings, or click the Skip button to skip this step. Both buttons will take you to the next step.
Configure Administrator Account
By default, PRTG uses the administrator account with login name prtgadmin and password prtgadmin. For security reasons you should at least change the password.
Please enter credentials and email address for the administrator account.
The password must meet the following requirements:
- at least eight characters long
- at least one number
- at least one capital letter
Click the Save & Next button to apply your settings, or click the Skip button to skip this step. Both buttons will take you to the next step.
In order to monitor your Windows clients and servers via Windows Management Instrumentation (WMI), please enter Windows administrator credentials for your network. We recommend using Domain Administrator credentials (if you're using an Active Directory).
PRTG will store these credentials in the Root group of your device tree. All Windows-based devices will automatically inherit and use them for monitoring. You can discontinue Inheritance of Settings at any level, entering other credentials instead.
For a general introduction to the technology behind WMI, please see Monitoring via WMI section.
Click the Save & Next button to apply your settings, or click the Skip button to skip this step. Both buttons will take you to the next step.
In order to monitor your hardware (router, switches, etc.), Simple Network Management Protocol (SNMP) is the most common protocol used. Usually, all SNMP-enabled devices use the same settings by default: SNMP version 1, community string public, SNMP port 161).
You only need to change values here if the SNMP-enabled devices in your network use other settings. Choose between:
- No: You SNMP-enabled devices use the default configuration. If you're not sure, choose this option.
- Yes: Choose this option to enter your own SNMP credentials and settings. More settings will appear. Choose the SNMP version, enter the community string and SNMP port number, and define a time out for SNMP connections.
PRTG will store these credentials in the Root group of your device tree. All SNMP-based devices will automatically inherit and use them for monitoring. You can discontinue Inheritance of Settings at any level, entering other credentials instead.
For a general introduction to the technology behind SNMP, please see Monitoring via SNMP section.
Click the Save & Next button to apply your settings, or click the Skip button to skip this step. Both buttons will take you to the next step.
Enter VMware/XenServer Credentials
If you use the virtual environments VMware or Citrix XenServer, PRTG can monitor them as well. To do so, please enter root access credentials for those systems. Choose between:
- No: PRTG will not monitor virtual environments. You can later add those credentials.
- Yes: Please enter user name and password for VMware or XenServer systems. For VMware, please also specify the protocol that will be used to connect.
PRTG will store these credentials in the Root group of your device tree. All VMware/XenServer-based devices will automatically inherit and use them for monitoring. You can discontinue Inheritance of Settings at any level, entering other credentials instead.
For an overview of all available VMware and XenServer sensors, please see List of Available Sensor Types, section "Virtual Servers Sensors".
Click the Save & Next button to apply your settings, or click the Skip button to skip this step. Both buttons will take you to the next step.
Enter Linux/Solaris/Mac OS Credentials
If you have systems running on Linux, Solaris, or Mac OS X, PRTG can monitor them as well. To do so, please enter root access credentials for those systems. Choose between:
- No: PRTG will not monitor devices via SSH/WBEM. You can later add those credentials.
- Yes: Please enter SSH/WBEM credentials. You can either provide username and password, or paste a private key. For WBEM access, please also define protocol and port. Additionally, specify the rights an SSH command will be executed with.
PRTG will store these credentials in the Root group of your device tree. All SSH/WBEM-based devices will automatically inherit and use them for monitoring. You can discontinue Inheritance of Settings at any level, entering other credentials instead.
For a general introduction to SSH monitoring, please see Monitoring via SSH section.
Click the Save & Next button to apply your settings, or click the Skip button to skip this step. Both buttons will take you to the next step.
Monitor Your Internet Connection
PRTG can monitor the availability of your default gateway and DNS servers. It will try to automatically detect and pre-populate the respective fields with the correct IP addresses. Please review and/or enter the IP addresses of your default (internet) gateway and your DNS server(s). Enter each IP address/DNS name in one line.
Note: For most networks, the gateway is the IP address or DNS name of your firewall or router. If you do not have a second DNS server, simply leave the respective field blank.
PRTG will create a new device for each entry and run an auto-discovery to set up sensors. In the background, auto-discovery will start immediately after you confirm this step.
Click the Save & Next button to apply your settings, or click the Skip button to skip this step. Both buttons will take you to the next step.
PRTG can monitor your AD domain controllers, Exchange or other mail servers, as well as additional servers in your network. PRTG will try to automatically detect and pre-populate the respective fields with the correct IP addresses. Please review and/or enter the entries for your Active Directory domain controllers and mail servers. Enter each IP address/DNS name in one line.
PRTG will create a new device for each entry and run an auto-discovery to set up sensors. In the background, auto-discovery will start immediately after you confirm this step.
Note: Your entries will not be shown in the Configuration Guru after confirming this step but will be added as devices to your device tree nevertheless. The Configuration Guru option Monitor LAN Servers will be marked with a green check mark as well if one or more servers were defined in this section.
Click the Save & Next button to apply your settings, or click the Skip button to skip this step. Both buttons will take you to the next step.
PRTG can monitor your website and online shop using http. Simply enter the URLs you want to monitor, each in one line.
PRTG will create a new device for all of your websites, with one sensor for each URL.
Click the Save & Next button to apply your settings, or click the Skip button to skip this step. Both buttons will take you to the next step.
To see if the cloud services that you usually use are up and running, PRTG can set up http sensors for those as well. In the list of services, simply switch the radio button to Yes for each service you want to monitor. Choose from:
- Google Search, Google Mail, Google Drive
- Microsoft Office 365
- Salesforce
- Dropbox
- iCloud
- Skype
PRTG will create a new device for all of cloud services, with one sensor for each URL.
Click the Save & Next button to apply your settings, or click the Skip button to skip this step. Both buttons will take you to the next step.
PRTG can scan an entire network segment, automatically detect devices, and create sensors using its auto-discovery.
PRTG will try to automatically detect and pre-populate the respective fields with the correct IP range. Please review and/or enter the entries. In the IPv4 Base field, enter the first three octets of your network's IP range, for example 192.168.0 or 10.0.0, or whatever IP address range you use. If you don't change the default values for IPv4 Range Start and End, PRTG will automatically complete the IP base and scan all IP addresses ending in .1 to .254.
If you need more options regarding the definition of IP ranges, you can run additional auto-discoveries later. Please see Auto-Discovery for more details.
Click the Save & Next button to apply your settings, or click the Skip button to skip this step. Both buttons will take you to the next step.
While you were busy using the guru, PRTG has already created devices and sensors for you. There are first monitoring values available, too. In the meantime, you can follow PRTG on your favorite social network by clicking on of the buttons for Facebook, Twitter, or Google +.
Click on the OK! Let me view my new sensors! button to view the device tree.
In order to get familiar with the PRTG web interface, we recommend you proceed with section General Layout of the web interface, or with General Layout of the Enterprise Console.
Keywords: Auto-Discovery,Auto-Discovery Quick Start